AWS CodeCommit
2018-12-10
Amazon has become a major player in the DevOps world with AWS CodeCommit. Their Continuous Integration and Continuous Deployment (CI/CD) suite of tools offers developers world class source control, build and deployment tools.
The foundation of the AWS DevOps suite is CodeCommit, their git based source control system. If you are looking to get started on the AWS development path this is where you need to start.
This post introduces the basics of CodeCommit and what it brings to the table for you as a developer on the AWS DevOps platform.
Ready? Let's go!
First some Benefits of AWS CodeCommit
To truly get excited about the potential of CodeCommit you need to understand some of the benefits it will bring to the table. There are three that really help it shine.
Benefit #1: Based on git
For source control management git has become one of the most prevalent source code management, SCM, platforms.
If you aren't familiar with git or if you just want a helpful reference check out Atlassian's Git cheat sheet. It will come in handy when you are trying to remember the Git commands needed for basic or more arcane commands.
CodeCommit uses the git engine for SCM, so all of your git knowledge is fully transferable to CodeCommit.
You'll also benefit from the flexibility of git's branching capabilities and adaptability to almost any development process.
Benefit #2: Free Access!
Right now, Amazon offers free access to CodeCommit for teams of up to five members. That includes 50GB of storage, and 10,000 git requests per month. That should be plenty of room to give CodeCommit a thorough test drive.
If you decide to go beyond five members CodeCommit is $1 per month per active user and includes 10 GB storage per user and 2000 git requests per user per month.
Extremely affordable.
Benefit #3: Fully Integrated with AWS CI/CD Tools
As you begin building systems with AWS you will be getting a head start with CodeCommit. AWS continuous integration, CodeBuild and continuous delivery, CodeDeploy build on the code repositories you create with CodeCommit.
Once you are ready to fully automate your releases these components plug directly into AWS CodePipeline which allows you to automate delivery to various environments from dev to test to prod with any testing or confirmation that needs to occur along the way.
How do you get started with AWS CodeCommit?
Amazon makes it really easy to start working with CodeCommit. The first step is getting setup with an AWS account.
Good news! If you've ever ordered anything from Amazon you already have an AWS account. Just head over to https://aws.amazon.com and log in with the same account you use to log in to Amazon.com
Once you are in, from the Services menu type CodeCommit and click the link that appears.
Bingo!
Setting up your first CodeCommit Repository
When you first access the CodeCommit console you will see an empty list of repositories.

Click the "Create Repository" button.
This will bring up a screen to enter the name of your repository and a description to help you remember what it was for.
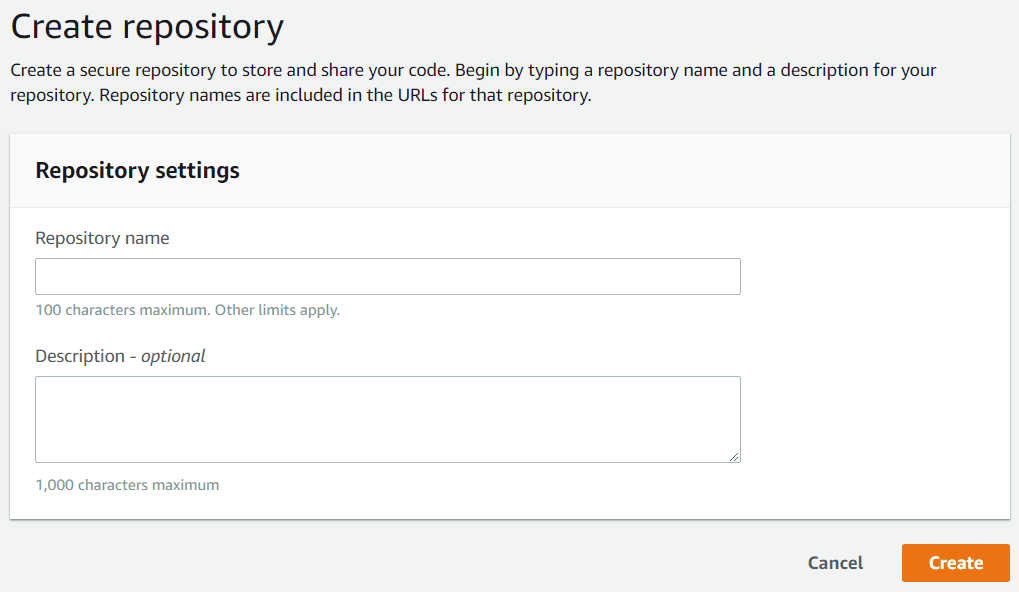
Enter the appropriate information for your repository and click the "Create" button.
Connecting to Your New Repository
Now that your repository is created you will need a way to connect to it. One of the simplest ways to do this is to use Identity and Access Management, IAM, to create a user to log into the repository.
From the services menu in the AWS console type "IAM" and select the link that comes up.
This will display the IAM console.
Select the Users link in the left navigation pane to display your current list of users.
Click the "Add user" button to start the user creation process.
Enter a user name and select the "Programmatic Access" check box. Click the "Next: Permissions" button.
Choose the "Attach Existing Policies Directly" option and type "CodeCommit" in the search box.

Check the checkbox of the "CodeCommit Full Access" policy and click the "Next: Tags" button.
Tags are searchable and help you find and organize your AWS resources in the future. Add any tags you would like for this account.
Click the "Next: Review" button.
Make sure everything is as you like it and click the "Create User" button.
You will be presented an option to download your user security credentials. This is the only time you will be able to download these credentials. This is important! Download the file and place it in a safe location.
Click the "Close" button.
Hurrah! Your account is set up. Now it's time to create a login and password.
Create a Login and Password for you IAM User
From the list of IAM users click on the user you just created.
Click the "Security Credentials" tab.
In the "HTTPS Git Credentials for CodeCommit" section click the "Generate" button.
You will be presented with a screen showing your newly created login name and password. You will also be encouraged to download these credentials to a local CSV file. Go ahead and do that. Save the file in a safe place.
Now you have everything you need to connect to your new CodeCommit repository.
Time to Connect
Return to the CodeCommit console to see your repository displayed in the Repositories list. Click it to go to the details screen.
Click the "Clone URL" drop down and select the HTTPS option. This will automatically copy the git repository URL to your clipboard.
Make sure you have installed the appropriate git client on your computer so that you can use the command line utilities to connect to your CodeCommit git repository. Client list for Git (this is clickable).
On a Windows machine open command prompt and change to the directory that you will house your source code directories in. I use c:\git to give me plenty of room if directories start to get deep and file names/paths start getting long.
Type the command below to clone your git repository to your local machine.
git clone https://git-codecommit.us-east-1.amazonaws.com/v1/repos/your-repo
You will be prompted for your user name and password. Enter those that you generated previously.
You will get a message that you "appear to have cloned an empty repository". Yep! That's what you want to see.
This will create a directory with the same name as your repository. Change to that directory.
Now, let's just do a simple test to confirm everything is up and running.
Testing your CodeCommit Repository
Let's create a text file and push it to your repository. At the command prompt type:
notepad readme.md
You will be asked if you want to create a new file. Hmm... hard choice. Choose yes.
Enter the text "Hello, world!" in the text file. Save it and close it.
Now it's time to commit and push your file to the CodeCommit repository on the AWS cloud.
Type the following commands:
git add * git commit -m "Adding readme.md file" git push
You will be notified that your file has been successfully pushed. Let's verify it's in place.
From the CodeCommit console click your repository.
You will see the files in your repository listed as well as the contents of your readme.md file.
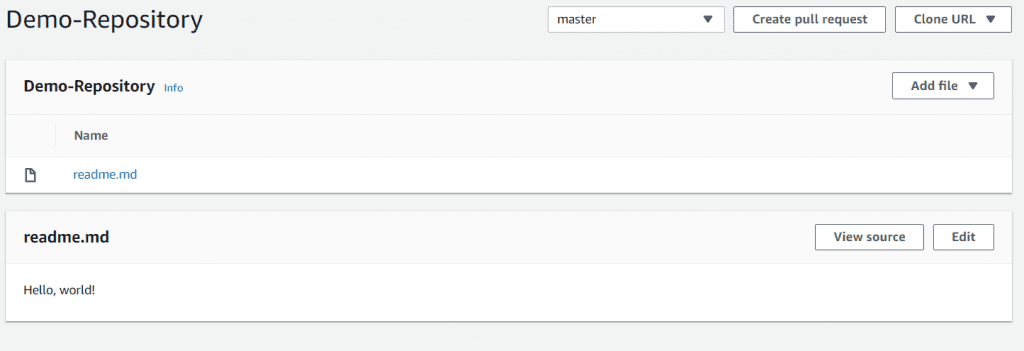
Done!
What's next?
You're now set to begin using your CodeCommit repository. Connect it to your favorite development IDE and start coding away.
When you're ready to start implementing continuous integration you'll want to look at CodeBuild. I will have a post introducing CodeBuild coming up very soon.
In the mean time, give CodeCommit a try. Kick the tires and see what it can do for you.
If you ever have any questions please contact me. I will be happy to help in any way that I can.
AWS Cloud Overview
Get an in depth introduction to AWS Cloud. My Essentials article provides a solid foundation of the AWS technologies on which to build your understanding of AWS.